I’m a licensed nail tech who is excited to share how to keep your nail polish from chipping! Salons don’t want you to know their tips and tricks for long lasting manicures which is why I’m spilling the beans. If you apply these simple tips you’ll learn how fun and easy it is to do your nails at home and get longer lasting polish. I promise it works (for toes too)!
! This is one of those awesome tutorials that every girl needs in her life. Stop by and see my ideas for yourself…no doubt it’ll be life changing!")
Something you may not know about me is that I’m a licensed nail technician. (Yes, I still keep my license renewed.) Years ago when I worked at a salon, I learned the tips and tricks that I’m going to share with you today. Clients always raved at how long their polish lasted just by using these simple techniques.
! This is one of those awesome tutorials that every girl needs in her life. Stop by and see my ideas for yourself…no doubt it’ll be life changing!")
Here are the nail products I’ll be talking about and sharing:

File your nails, push back your cuticles, and you’re ready to begin.
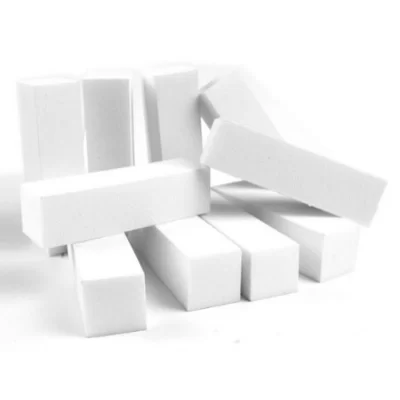
Step #1: Buff your nails using a Block Buffer
Nails are naturally porous and the goal of buffing your nails with a Block Buffer is to remove as much moisture from the nail as possible.
Tips:
- Do not use a nail file in place of a Block Buffer. Nail files will remove too much from the surface of your nail and weaken it.
- As you can see above, this how you should hold your Block Buffer when I’m using it.
- If it’s your first time using your Block Buffer, run your nail file over the four pointy edges. This will dull the edges and prevent your cuticles from getting cut and scratched up.
! This is one of those awesome tutorials that every girl needs in her life. Stop by and see my ideas for yourself…no doubt it’ll be life changing!")
This is how my nails looked after I buffed them with the Block Buffer.
Step #2 – Spray your nails with rubbing alcohol.
Along with cleaning the dust off of your nails, this step also helps dry out your nail bed.
Tip:
- If you don’t have a small spray bottle, you can also pour rubbing alcohol into the bottle’s lid and dip your nail in it.
! This is one of those awesome tutorials that every girl needs in her life. Stop by and see my ideas for yourself…no doubt it’ll be life changing!")
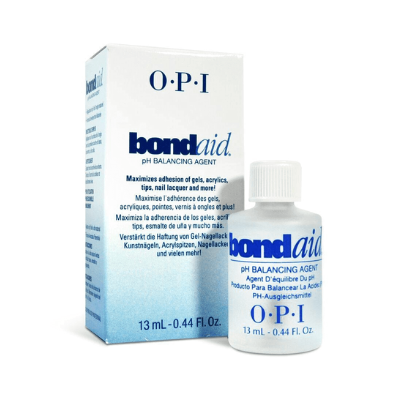
Step #3 – Apply OPI Bond Aid
The most important step, and definitely NOT one that should be skipped.
This is the third and final step in drying out your nail bed. When the rubbing alcohol has dried, apply a coat of OPI Bond Aid just as you would regular nail polish. Your nails will still look extremely dry but that is exactly what you want!
! This is one of those awesome tutorials that every girl needs in her life. Stop by and see my ideas for yourself…no doubt it’ll be life changing!")
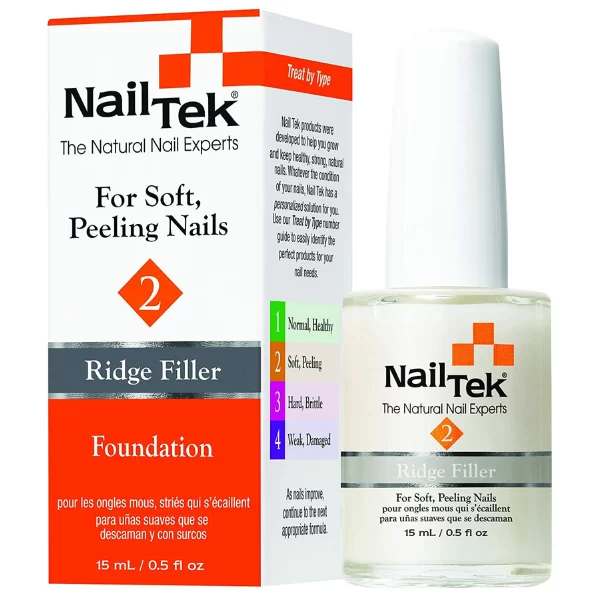
Step #4 – Apply a base coat.
You can use any base coat, but I recommend Nail Tek Foundation. It not only works as a base coat, but the Nail Tek products strengthen your nails. As you can see, Nail Tek Foundation gives your nails a nice matte finish.
Tips:
- For each coat of polish you add to your nail, you’ll want to seal it by running the polish brush over the edge (tip) of your nail.
- As you’re polishing your nails, be very careful not to get any polish on your cuticles or the skin around your nails. That being said, if you do get some on your skin (it’s kind of inevitable) you can either let it dry and remove it later, or use an Orange Wood Stick (which is also what I use to push back my cuticles) dipped in nail polish remover to get it off.
! This is one of those awesome tutorials that every girl needs in her life. Stop by and see my ideas for yourself…no doubt it’ll be life changing!")
Step #5 – Apply polish.
There are tons of different brands of nail polish. Choose your favorite color and apply two coats. If you do a French Manicure like I did today, you only need one coat of white on the tips.
Tips:
- OPI Alpine Snow is the bright white to use for your French Manicure.
- If you don’t like the bright white of a French Manicure, you can always apply one coat of OPI Throw Me A Kiss (pink with a shimmer) Be There In A Prosecco (creamy), or OPI Bubble Bath (pink without shimmer) (or any other very light colored polish) on top of your white tips. You’ll definitely want to test it on one nail before you begin to see if you like it.
! This is one of those awesome tutorials that every girl needs in her life. Stop by and see my ideas for yourself…no doubt it’ll be life changing!")
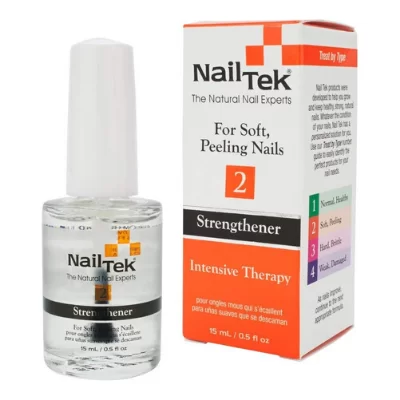
Step #6 – Apply a top coat.
While you can use any top coat, I recommend Nail Tek II. As I said before, the Nail Tek products strengthen the nails.
Tip:
- Let your nails dry for a few minutes before applying your top coat. If they’re still wet when you apply the top coat, you could get white (or whatever color you’re using) on your brush. Red could give your entire bottle of top coat a pink tinge and white could add a streak of white to the rest of your nails. (Definitely not fun after all the work you’ve already done.)
! This is one of those awesome tutorials that every girl needs in her life. Stop by and see my ideas for yourself…no doubt it’ll be life changing!")
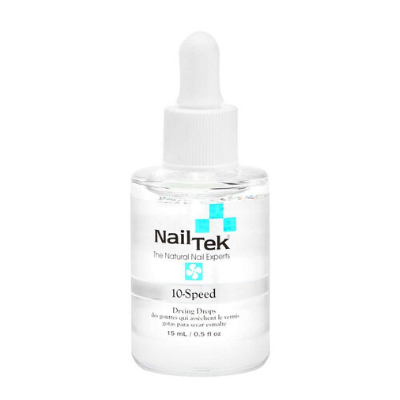
Step #7 – Apply Nail Tek 10-Speed.
There are many drying products, but Nail Tek 10-Speed is the one that I’ve used for years and recommend. The Nail Tek 10-Speed speeds up the drying process, but I always recommend that you let your nails dry for 30-60 minutes.
And there you have it, my salon secrets to keep your nail polish from chipping. Keep in mind that if your hands are in a lot of water, your polish just isn’t going to last as long. (You might consider wearing gloves to wash dishes, garden, etc.)
Maintenance Tip:
I recommend sealing the edges every few days by running the top coat brush over the edge of your nail. Many of my clients apply a coat of Nail Tek II to their nails every day. Doing this not only strengthens their nails but also keeps their polish from chipping.
What are your tips and tricks to keep your nail polish from chipping?
Supplies used in this article:
Thank you for sharing this post! I just recently started doing my nails and my polish was chipping within a few days, so this was very helpful! I’m pinning it for future reference. :)
You’re more than welcome Sarah! I’m so glad you found these tips helpful!
Thanks for stopping by!
mine peels off no matter what and im discouraged. Frustrated thatni try so hard and study the directions.i started bas8c cosmetology so i was searching my textbooks and did it exact and then pinterest and YouTube. Whatnis wrong with them lol my nails?i followed pinterest and YouTube of these steps
I’m sorry to hear that you’re discouraged! You might just have super oily nails which makes your polish chip very easily.
Use no chip gel polish, I have the same problem, but now that I use the gel polish I have no problems. ( you will need a curing lite. )
Yes, you could definitely use the gel polish. I’m glad you’ve found a solution that works for you!
I also like to use a top coat called gelous. It is a gel top coat that does not need to be used with a light. I got mine at sallys. I put a regular top coat over it and my nails last atleast a week instead of chipping the next day.
This is the first I’ve heard of Gelous. Thanks for sharing, Caitlin!
I also like the Gelous top coat but I am excited to try the OPI bond aid and the Nail Tek products! thanks for sharing!
You’re welcome Lisa!
Great pointers!! I normally tend to stick with certain polishes too… NYC Color and shenailpolish are 2 of my favorites! Thank you!
I’m glad you found them helpful Rebecca! I’m with you and normally stick with certain brands too!
Thanks for stopping by!
Great tips!
Thanks Akaleistar! I’m glad you found them helpful!
As an instructor / operator I think it is not good advice to use bond aid with nail polish application. Bond aid is made to use with acrylic products only. Bond aid works by opening the layers of the nail plate to grasp the acrylic it is a chemical reaction which then closes the plates and holdes the product on. It does not work properly with polish application as the plates stay open and therefor weaken the nails. Base coat is made to make the polish adhere, it is like a double sided tape, sticks to the nail and to the polish drying to form a strong bond. Other than that your information is great !
I’ve used Bond-Aid on myself and my clients for years and have never had any complaints about it weakening their nails.
Thanks for sharing Donica!
Thanks for the tips! I *just* started doing my own nails after going to a salon for years and found that when I went outside and it was humid (or I played tennis–which I like to do), the polish would look whiter (I’ve been using Essie Mademoiselle which is pretty sheer light pink) and then peel off.
I just took off my polish, tried buffing and put some rubbing alcohol (I always wondered why they sprayed it on your nails in a salon; now I know!! thanks!!) and have been layering the coats. Am planning on getting Nail Tek II.
I hope this works!
Thanks again.
You’re more than welcome Jill!
Polish peeling from your nails is very unhealthy for your nails because, along with the polish, it removes the top layer of your nail. I hope these tips work for you too!
Thanks for stopping by!
Thanks Tshanina! Actually, tried it yesterday and so far, works like a charm! I actually bought a small sprayer for the alcohol and haven’t yet tried the Opi Bond Aid or Nail Tek (I’m working my way through a nail-hardening base by Essie and Quik Dry top coat by Seche Vite, but once I’m out of those will switch to Nail Tek.
Thanks again. My nails look and feel terrific!
I’m so glad to hear that Jill! (I’d be the same way and finish the bottles I already have too.)
Take care!
Hi Thrifty T,
I love your nail tips. Do you ever use gel polish? I started doing my own nails a few years ago & use Gelish products.
I was wondering if the NailTec products last as long & can they be removed with regular nail polish remover? Gelish is hard to get off unless you soak in pure acetone & makes them brittle. Your thoughts please:) thanks so much!
Phyllis, I know a lot of people that have great success with the gel polishes. I haven’t used them myself because they are a bit harder on your nails than normal polish (but definitely not as hard as acrylics and such)!
Yes, the NailTek products can be removed with regular nail polish remover. As to how long they will last, it’ll definitely depend on how hard you are on your nails. When I was doing nails I had a client that would put a top coat of the NailTek on every other day to help her manicure last a bit longer. When she came in after 2 weeks her nails still looked pretty good!
[…] of course, I used my Salon Secrets To Prevent Nail Polish from Chipping, but topped it with the Freedom Polymer Top […]
I have a question: Can I run a fan to keep from being overheated in my workspace or will it dry out the gel and gel brush as the product is being applied?
Renee, I’ve never worked with gel nails so I’d hate to steer you in the wrong direction. You might check with someone who does!
There’s nothing worse than chipped nails! I’m glad you found these tips helpful.
Thanks for stopping by, Kim!
Hi Tshanina, it’s my first visit here and I love these hints! Manicures done well are a special passion of mine (I cannot abide chipped nail polish!), and I can really see this working! I’d love if you’d come and share at my Five Star Frugal at A Tray of Bliss linkup tomorrow, Friday. I’d love to host you there! Love, Mimi xxx
There’s nothing better than beautiful manicure is there? Thanks for stopping by, Mimi!
Hey! Thanks! Just had my nails done in a French Manicure for my daughter’s wedding and was always wondering what the things were called and WHY she was using them. Now I know. One of these days I will go to the beauty supply place and get it all myself and give it a whirl. You have been very helpful, and I appreciate it.
Found you from over at Common Ground “Share Your Style” linky party.
I’m glad you found these tips helpful, Michele!
Thanks for stopping by!
Hi,I wanted to thank you for sharing this. I do my own nails mostly because I have asthma and the smells in the salon bother me. My nails always chip, sometimes the same day. I used a different base coat because the one mentioned has an ingredient I’m allergic to and hoof hardener for the top. I am on my fourth day and recovered the edges on the second day with no chipping. It’s amazing! I do have one question, for some reason my nail polish always cracks in the shape of a V up my nail in little cracks. Do you know why that is? Thank you again! Amazing tips!
Jennifer
Yay, Jennifer! I’m so glad these tips worked for you.
[…] Directions via thriftyts treasures. […]
Wondering about oils, lotions, and conditioners. Do you recommend putting anything on the cuticles or nails after. My nails always seem to peel from the center near my cuticles.
If your cuticles are dry then, yes, I recommend putting a drop of oil or lotion on them.
Is it your nails or polish that is peeling from the center? If it’s your polish, it sounds like you’re getting polish on your cuticle when you’re applying the polish to your nails. I know it can be difficult but try to avoid getting polish on your cuticles/skin around your nails and your polish might last longer!
It is good to know that using a block buffer is better than using a nail file. Using a buffer won’t weaken the nail while drying it out. I’ll have to pass this along to my sister who wants to be a nail tech in the future.
So glad you found that helpful. Please do share!
Love these tips!!!!
Thanks, Shaunda!
Thanks for some great tips! My nail polish never lasts more than a day. I’m definitely going to try your advice.
I look forward to hearing how it works for you Carolyn!
Hi Tshanina,
I want to THANK YOU for being kind enough to share this valuable information about manicures. Finally, something that works for my nails! I am saving money by not having my nails done at a salon. Much better to put the money in savings for retirement.
Peace of Christ and happiness to you!
Tina K.
I’m so excited to hear this has worked well for you, Tina! It’s amazing how much money you can save doing your nails at home isn’t it?!
Thanks so much for stopping by and sharing.
Hi! How long do you estimate it takes for top coat polish to dry when applied the day after (for extra protection)?
Hi Jill! I would say about 45 minutes.
I’ve purchased all the products you’ve mentioned and can’t wait to try them. Thanks so much for sharing.
Yay Sheila, I’m so excited for you!!!
I’m so excited to hear this has worked well for you, Tina! It’s amazing how much money you can save doing your nails at home isn’t it?!Benadryl